
After installing the Ohlins with the default setup:
Springs: Front : 5kg/mm ( 1kg/mm helper spring )
Rear : 8kg/mm ( 1kg/mm helper spring )
Sway Bars: Front : Whiteline adj/ 22mm
Rear: None
..and testing it at the track ( www.athenscircuit.gr ) i was happy with the overall feel of the car but troubled with the oversteering setup of the car..It was logical though, since the front roll rate with the sway bar (5kg/mm spring+22mm sway) was almost equal with the rear roll rate (8kg/mm spring only). And since there is more weight on the rear of the car,the rear will lose traction first.
So,without thinking it much,i ordered a pair of Hypercoil Springs (11.6kg/mm - 650 lb/in) for the front only,losing also the front sway bar:


So,the suspension characteristic from now on will be:
Springs: Front : 11.6kg/mm ( 1kg/mm helper spring )
Rear : 8kg/mm ( 1kg/mm helper spring )
Sway Bars: Front : None Rear: None
Me and my buddy(team manager :p) Sikrip decided to change them out ourselves since it is not difficult..You can see from the pictures that he did most of the work as i had the work of taking pictures..hehehe! Thanks man!
Ok,now on to the how-to:
First unscrew all the numbered bolts/nuts:

Also,remove these 3 nuts (support/hold the coilover at that time or it will fall):

After you removed all these stuff,just move the coilover in and out to let it out of the suspension knee.
Now you can start changing the spring.
Step A:
Unlock the spring seat rings using your spring perches and move them BOTH all the way down so there is no preload on the springs.If using helper springs(like I am) there will be a slight preload only on the helper but you got nothing to worry about:
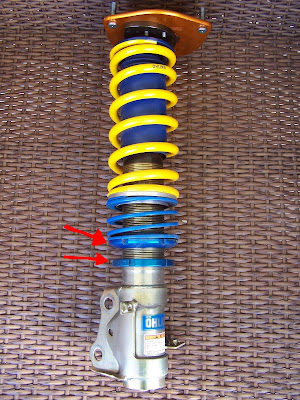
Step B:
Most coilovers need an Allen key for dismantling them.Mine though, needed a Torx key T40 to be exact.Hold the top nut secure with a wrench and turn the torx till you separate the parts:

Step C:
Now you have the following parts.The body of the shock,the spring seat,a thick washer that goes between the spring seat and the top mount,the top mount and the top nut.


Take a look of the two springs:
Yellow:5kg/mm and
Blue:11.6kg/mm

Step D:
Reassembly.This goes as follows:Shock boot,helper spring with spring seat,spring,spring seat,thick washer,top mount and screw in the top nut.Then using the Torx key make sure you tighten it all up:


That's about it.On a scale of 1-10 i would say that this is a 4.
Total time for the front suspension was about 2hr with a lot of fun breaks like this one:
Sikrip trying to compress the 11kg spring: hahahaha

And here's me pointing out that he forgot to do something there.. :)


